Updated 7/31/2023 to reflect changes in certbot and the required Intermediate Certificate.
Liquid Web CloudSites offers paid SSL certificates, but the system supports the free Lets Encrypt Certificates, but you have to manage those certificates manually on another system.
The first step is to install ‘cerbot‘ a Lets Encrypt certificate tool to create and manage certificates on your local computer system, or if you have an external linux box you can install it there and also use it to create and update server SSL Certificates you may need for that system. If installing on a Mac, consider using HomeBrew as it can simplify some of the installation.
To create a certificate with certbot and Lets Encrypt, you have to prove ownership of the name(s) the certificate is being created. The most common ways are adding domain records as prompted, or creating hash-named files on the live site that are accessible via http. For the instructions here I’m going to do the later.
An FTP application will be needed to create those files (I’m using Panic’s Transmit on my Mac, but any FTP client should work), and FTP credentials to the site on CloudSites (Can be per-site set of credentials, or CloudSite account credentials).
Type the following certbot command (all as one line) to start creating the certificate for CloudSites:
% sudo <path-to>/certbot certonly --manual --preferred-challenges http --key-type rsa -d sitename.com www.sitename.com
The “<path-to>/certbot” would be the path to your particular installation of certbot. The ‘certonly’ tells certbot we only want to create the certificate and ‘–manual –preferred-challenges http’ we’re going to manually validate ownership by having Lets Encrypt read files we create on the current site. The last of the command ‘-d sitename’ is where the list of site names to include in the certificate. For each name, the process will stop and prompt for a special hashed-named file to be created and read before continuing. The ‘–key-type rsa’ argument used to be the default for certbot, but in late 2022 or early 2023 the default changed to ECC key types. Unless your server is expecting an ECC certificate, you probably want the RSA certificate (which I think is all CloudSites currently supports anyway).
From the command above, something similar to the following should display:
Saving debug log to /var/log/letsencrypt/letsencrypt.log
Creating new certificate for sitename.com
-------------------------------
Create a file containing just this data:
KMyQbAzAnWQx2MzjQNC9zdtqHuvMQJHj-ougWZNQvSI.6jQsET1r_YAhobquQoDlIlfe9KLPX5B64Q-Nq-QZ9Wo
And make it available on your web server at this URL:
http://sitename.com/.well-known/acme-challenge/KMyQbAzAnWQx2MzjQNC9zdtqHuvMQJHj-ougWZNQvSI
-------------------------------
Press Enter to Continue
Use the FTP application and create at the root of the site (Document Root) a folder ‘.well-known’, within that ‘acme-challenge’, and for this challenge a file named ‘KMyQbAzAnWQx2MzjQNC9zdtqHuvMQJHj-ougWZNQvSI’ (each challenge will have a different filename and contents). Open the created file and copy/paste in the contents ‘KMyQbAz…4Q-Nq-QZ9Wo’ and save the file.

Press enter to continue. Assuming the challenge file prompted was found and the contents matched what was requested, the next certificate name challenge will be prompted. Repeat until it no longer prompts to create challenge files and if successfully something like the following should display:
Successfully received certificate.
Certificate is saved at: /etc/letsencrypt/live/sitename.com/fullchain.pem
Key is saved at: /etc/letsencrypt/live/sitename.com/privkey.pem
This certificate expires on 2022-07-10.
These files will be updated when the certificate renews.

NEXT STEPS:
- This certificate will not be renewed automatically. Autorenewal of --manual certificates requires the use of an authentication hook script (--manual-auth-hook) but one was not provided. To renew this certificate, repeat this same certbot command before the certificate's expiry date.

- - - - - - - - - - - - - - - - - - - - - - - - - - - - - - - - - - - - - - - -
If you like Certbot, please consider supporting our work by:
 * Donating to ISRG / Let's Encrypt: https://letsencrypt.org/donate
 * Donating to EFF: https://eff.org/donate-le
- - - - - - - - - - - - - - - - - - - - - - - - - - - - - - - - - - - - - - - -
The certificate and key have been created. Next is to install them on the site within CloudSites.
Noted in the above command output several files were created inside the directory /etc/letsencrypt/live/, fullchain.pem, privkey.pem, and two others not listed cert.pem, and chain.pem. The fullchain.pem incorporates both those later files. Echo (cat) the contents of the privkey.pem and cert.pem to copy/paste them. The privkey.pem will look like:
sudo cat /etc/letsencrypt/live/sitename/privkey.pem
-----BEGIN PRIVATE KEY-----
MIIEvgIBADANBgkqhkiG9w0BAQEFAASCBKgwggSkAgEAAoIBAQDIK/TG//e/0kTd
...
vpvnT3ewu+GJFU4u6oCMYSMIqtonDlpFpYRWYzQ6BqDvhpp93bNs7xBZN5Rrvgw6
BlvJQm+U+NTKaHg3olyyBUlk
-----END PRIVATE KEY-----
and the cert.pem will contain the actual SSL Certificate:
sudo cat /etc/letsencrypt/live/sitename/cert.pem
-----BEGIN CERTIFICATE-----
MIIFNzCCBB+gAwIBAgISBGMtJpZZJP0jVckiB4l+WfW1MA0GCSqGSIb3DQEBCwUA
MldlTTKB3zhThV1+XWYp6rjd5JW1zbVWEkLNxE7GJThEUG3szgBVGP7pSWTUTsqX
...
he8Y4IWS6wY7bCkjCWDcRQJMEhg76fsO3txE+FiYruq9RUWhiF1myv4Q6W+CyBFC
nLRbwHOoq7hHwg==
-----END CERTIFICATE-----
The last item needed is known as the Intermediate Certificates. The certbot command generates a chain.pem (contents of which are also in the fullchain.pem), but the Intermediate there currently does not work with CloudSites. Instead, open a browser to https://whatsmychaincert.com. In the section ‘Generate the Correct Chain’ paste the certificate from above (contents of the cert.pem file) and click ‘Generate Chain’. There is an option to ‘Include Root Certificate’, doesn’t matter if this is set because we only need the 2nd certificate from the chain file that is downloaded. Open the sitename.chained.crt in a text editor (drag to NotePad, BBEdit, TextWrangler, etc.. If you double click the downloaded file it may try to install on certificate on your computer which is not needed). There should be two or three (if the ‘Include Root …’ was selected) certificates (start and ending ‘—–BEGIN CERTIFICATE—–‘ … ‘—–END CERTIFICATE—–‘). The first should match the certificate from above. The second is the Intermediate Certificate needed for CloudSites – this is what will be needed. That last if included is known as the Root, which for LetsEncrypt should already be known to modern browsers.
Within the CloudSites portal for the site you are creating the certificate, select the ‘SSL Configuration’ option. The image below the site happens to have a dedicated IP assigned, not necessary for the SSL Certificate. Paste in the Certificate (cert.pem), Private Key (privkey.pem), and the 2nd certificate in the crt file download from whatsmychaircert.com where prompted:
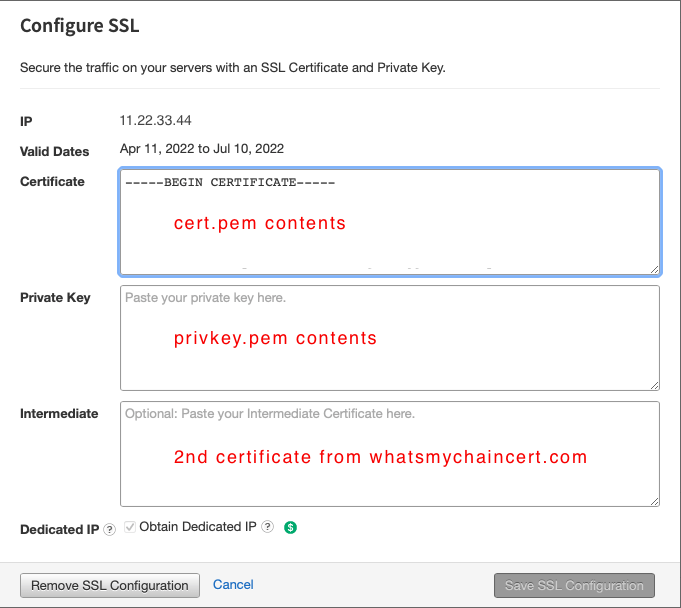
Click the ‘Save SSL Configuration’. If all is accepted, a few seconds later a message will display that the certificate has been added.
Lets Encrypt certificates are only valid for 90 days; therefore, add a calendar reminder in 75-85 days to repeat the same process (renewing is simply creating the certificate again).